Here's the finished product:
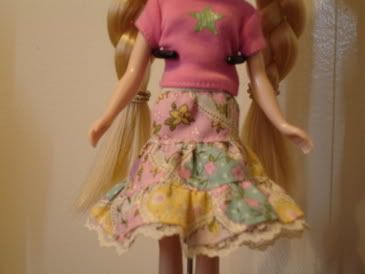
Cute, huh? It turned out even better than I'd expected.
It was also really simple to put together. Here's what you'll need:
3 fabric strips (one each of the following lengths - all sizes in inches):
5" x 1.5"
8.5" x 1.5"
13.75" x 1.5"
delicate lace for the bottom of the skirt - 13.75"
bias tape in color to match/complement the skirt fabric - 4 3/4"
All of the above include seam allowances (I'm not that cruel...)
Instructions:
Press under 1/4" to inside on one long side of the 13.75" piece, pin lace on the inside, covering the part you just pressed, allowing the lace to show at the bottom of the skirt - sew from wrong side (when you look at the right side, it should look like the lace is peeking out). You've just done the hem and attached the lace. Gather the top of the long piece and sew to the bottom of the 8.5" piece. Gather the rop of the 8.5" piece and attach to the 5" piece. Now it gets a little tricky. Gather the top of the 5" piece - the easiest way to do this is to pin it to the bias tape (which will eventually cover the top of the gathered skirt, but to start, hold the bias tape open to get the skirt gathered the way you like it). Fold under 1/4" on the right back of the skirt, and pin it 1/4" in from the end of the bias tape. Pin the left side of the skirt to the bias tape, also 1/4" in from the end of the tape (do not fold under the left side of the skirt though). adjust the gathers, then fold the tape over the top of the gathered part, fold in the 1/4" on each end and stitch the waistband (ie - the bias tape) onto the skirt. Now, fold the skirt (vertically - you're going to create the back seam now), and stitch from the bottom, ending where the top tier joins the middle tier (where you sewed the 5" piece to the 8.5" piece). Because you turned under 1/4" at the top of the right side, you'll want to press the back seam in that direction (instead of opening it up). Sew a snap to the waistband where you turned under the 1/4" on bias tape. And you're done!
If you're unsure of any of my instructions above, let me know - I've tried to make the instructions as clear as possible, but I may have taken some stuff for granted since I've been sewing since I was 10.
And now, just because I can...
GRATUITOUS KITTY PIC!

Gabbana tried to get into the box I brought Maia home in... Shortly after this photo, she knocked the box and its styrofoam popcorn all over the floor and was banned from the living room while I cleaned it up and put the box far away from prying kitties.


No comments:
Post a Comment